XAMPP-VM Frequently Asked Questions
- What is the difference between XAMPP for OS X and XAMPP-VM?
-
- XAMPP for OS X is a native installer for OS X. It installs Apache, PHP and other XAMPP components directly on your OS X system, in the /Applications/XAMPP folder.
- XAMPP-VM is a virtual machine for OS X. It includes Apache, PHP and other XAMPP components and runs them in a Linux-based virtual machine on your OS X system.
For more information, refer to the blog post at https://www.apachefriends.org/blog/new_xampp_20170628.html.
. - How do I install XAMPP-VM for Mac OS X?
-
To install XAMPP-VM, just do the following:
- Download the disk image (DMG image) from the Apache Friends website.
- Double-click the image file and drag the XAMPP-VM icon to the Applications folder.
- Launch XAMPP-VM by double-clicking the XAMPP-VM icon in the Applications folder.
- Enter your system's administrator credentials when prompted.
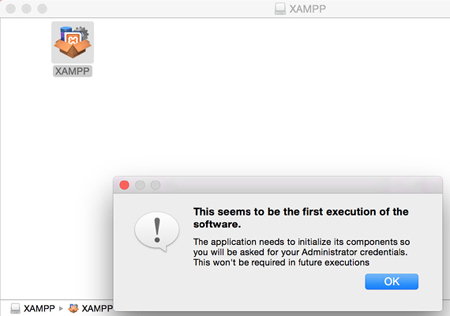
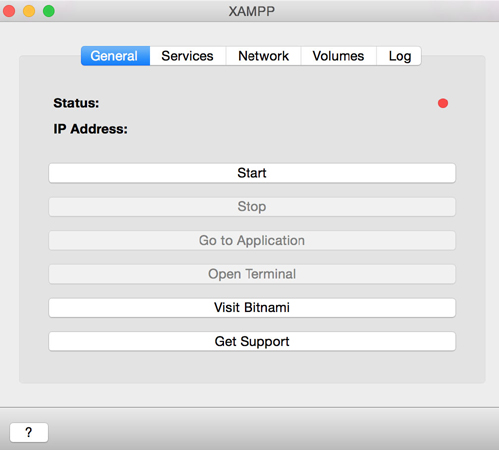
You should see the XAMPP-VM stack manager, as shown below:
- Does XAMPP-VM include MySQL or MariaDB?
-
XAMPP-VM ships MariaDB instead of MySQL. The commands and tools are the same for both.
- How do I start XAMPP-VM?
-
To start XAMPP-VM:
- Launch the stack manager by double-clicking the XAMPP icon in the mounted disk image.
- Click the "Start" button in the "General" tab of the stack manager. Wait for the status icon to turn green.
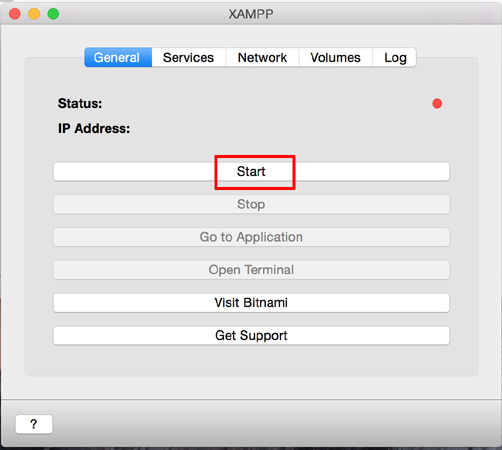
- Navigate to the "Network" tab and enable port forwarding (port 80 of the stack to port 8080 of the host system) over SSH.
- How do I stop XAMPP-VM?
-
To stop XAMPP-VM, click the "Stop" button in the "General" tab of the stack manager. Once the status icon turns red, close the stack manager window.
- Can I start and stop XAMPP-VM services individually?
-
Yes. When you start the XAMPP-VM virtual machine, XAMPP services will also automatically start. You can navigate to the "Services" tab of the stack manager at any time to stop, start, restart or check the status of individual services.
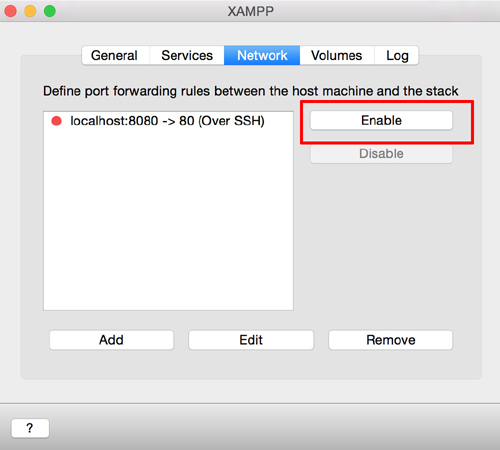
- How can I test that everything worked?
-
Verify that you have enabled port forwarding (from port 80 of the stack to port 8080 of the host system) in the "Network" tab of the stack manager and type the following URL in a web browser:
http://localhost:8080You should see the XAMPP-VM start page, as shown below.
- Is XAMPP-VM production ready?
-
XAMPP-VM is not meant for production use but only for development environments. The way XAMPP-VM is configured is to be open as possible to allow the developer anything he/she wants. For development environments this is great but in a production environment it could be fatal.
Here a list of missing security in XAMPP-VM:
- The MySQL administrator (root) has no password.
- The MySQL daemon is accessible via network.
- ProFTPD uses the password "lampp" for user "daemon".
- Launch the stack manager by double-clicking the XAMPP icon in the mounted disk image.
- Ensure that all services are running in the "Services" tab of the stack manager (or start them as needed).
- Open a new terminal from the "General" tab of the stack manager and run the following command in it:
/opt/lampp/lampp security
- Apache doesn't seem to start. What can I do?
-
This error can exist for multiple reasons. Apache displays this error under several circumstances. To find the exact reason, you have to do some research:
- Launch the stack manager by double-clicking the XAMPP icon in the mounted disk image.
- Open a new terminal from the "General" tab of the stack manager and run the following command in it:
tail -2 /opt/lampp/logs/error_log
If you get any error messages visit our community pages for help.
- translation missing: en.When I try to start the VM, it fails, with an error message, "cannot calculate MAC address". How do I resolve this?
-
This is most often a symptom of the VM running on a computer with an Apple M1 (arm64) CPU. The VM components do not support the M1 CPU (as of September 2022). You can only use the VM on computers with intel (x64) CPUs. On computers with the M1 CPU, please use the XAMPP native installers instead.
If you get any error messages visit our community pages for help.
- How can I make my XAMPP-VM installation more secure?
-
In the default installation, XAMPP-VM has no passwords set and it is not recommended to run XAMPP-VM with this configuration accessible by others.To make the installation more secure:
- Launch the stack manager by double-clicking the XAMPP icon in the mounted disk image.
- Ensure that all services are running in the "Services" tab of the stack manager (or start them as needed).
- Open a new terminal from the "General" tab of the stack manager and run the following command in it:
tail -2 /opt/lampp/logs/error_log - You should see the following dialog on your screen. Enter responses to each prompt.
XAMPP: Quick security check...
XAMPP: MySQL is accessable via network.
XAMPP: Normaly that's not recommended. Do you want me to turn it off? [yes] yes
XAMPP: Turned off.
XAMPP: Stopping MySQL...
XAMPP: Starting MySQL...
XAMPP: The MySQL/phpMyAdmin user pma has no password set!!!
XAMPP: Do you want to set a password? [yes] yes
XAMPP: Password: ******
XAMPP: Password (again): ******
XAMPP: Setting new MySQL pma password.
XAMPP: Setting phpMyAdmin's pma password to the new one.
XAMPP: MySQL has no root passwort set!!!
XAMPP: Do you want to set a password? [yes] yes
XAMPP: Write the passworde somewhere down to make sure you won't forget it!!!
XAMPP: Password: ******
XAMPP: Password (again): ******
XAMPP: Setting new MySQL root password.
XAMPP: Setting phpMyAdmin's root password to the new one.
XAMPP: The FTP password for user 'nobody' is still set to 'lampp'.
XAMPP: Do you want to change the password? [yes] yes
XAMPP: Password: ******
XAMPP: Password (again): ******
XAMPP: Reload ProFTPD...
XAMPP: Done.
After calling this command, your XAMPP-VM installation should be more secure.
- How do I activate eAccelerator?
-
To activate eAccelerator for PHP:
- Launch the stack manager by double-clicking the XAMPP icon in the mounted disk image.
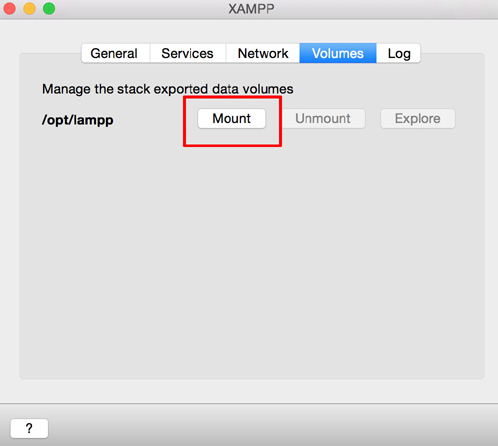
- Mount the /opt/lampp directory from the "Volumes" tab of the stack manager and click the "Explore" button to open the file manager.
- Find the following lines in your /opt/lampp/etc/php.ini file:
;extension="eaccelerator.so" ;eaccelerator.shm_size="16" ;eaccelerator.cache_dir="/opt/lampp/tmp/eaccelerator" ;eaccelerator.enable="1" ;eaccelerator.optimizer="1" ;eaccelerator.check_mtime="1" ;eaccelerator.debug="0" ;eaccelerator.filter="" ;eaccelerator.shm_max="0" ;eaccelerator.shm_ttl="0" ;eaccelerator.shm_prune_period="0" ;eaccelerator.shm_only="0" ;eaccelerator.compress="1" ;eaccelerator.compress_level="9" - Remove the semicolon at the beginning of each line and restart XAMPP.
The extension should now be active.For more information about eAccelerator, check the eAccelerator home page: http://eaccelerator.net.
- How do I activate the OCI8/Oracle extension for PHP?
-
To activate the OCI8/Oracle extension for PHP:
- Launch the stack manager by double-clicking the XAMPP icon in the mounted disk image.
- Ensure that all services are running in the "Services" tab of the stack manager (or start them as needed).
- Open a new terminal from the "General" tab of the stack manager and run the following command in it:
/opt/lampp/lampp oci8 - You should see the following dialog on your screen. Enter the path to the Oracle client libraries when prompted.
Please enter the path to your Oracle or Instant Client installation:
installing symlinks...
patching php.ini...
OCI8 add-on activation likely successful.
LAMPP: Stopping Apache with SSL...
LAMPP: Starting Apache with SSL...
The extension should now be active.
- How do I copy files to the Apache server document root?
-
To copy files from the host system to the XAMPP-VM Apache server document root, follow these steps:
- Launch the stack manager by double-clicking the XAMPP icon in the mounted disk image.
- Mount the /opt/lampp directory from the "Volumes" tab of the stack manager and click the "Explore" button to open the file manager.
- Navigate to the /opt/lampp/htdocs directory in the file manager. This directory is the XAMPP-VM Apache server document root. Copy files to it from the host system using the file manager in the usual way.
- How do I access phpMyAdmin from the host system?
-
To access phpMyAdmin from the host system, follow these steps:
- Launch the stack manager by double-clicking the XAMPP icon in the mounted disk image.
- Ensure that all services are running in the "Services" tab of the stack manager (or start them as needed).
- Navigate to the "Network" tab and ensure that port forwarding (port 80 of the stack to port 8080 of the host system) over SSH is enabled.
- Browse to http://localhost:8080/phpmyadmin to access phpMyAdmin.
If you see an "Access denied" error, ensure that your phpMyAdmin configuration correctly reflects your MySQL credentials.
- How do I enable access to phpMyAdmin from the outside?
-
In the basic configuration of XAMPP-VM, phpMyAdmin is accessible only from the host system via a secure tunnel, at http://127.0.0.1:8080/phpmyadmin or http://localhost:8080/phpmyadmin.
IMPORTANT: Enabling external access for phpMyAdmin in production environments is a significant security risk. You are strongly advised to only allow access from localhost. A remote attacker could take advantage of any existing vulnerability for executing code or for modifying your data.
To enable remote access to phpMyAdmin, follow these steps:- Edit the /opt/lampp/etc/extra/httpd-xampp.conf file.
- Within this file, find the lines below.
Alias /phpmyadmin "/opt/lampp/phpmyadmin/" <Directory "/opt/lampp/phpmyadmin"> AllowOverride AuthConfig Require local - Then replace 'Require local' with 'Require all granted'.
- Save the file and restart the Apache service using the stack manager.
Alias /phpmyadmin "/opt/lampp/phpmyadmin/" <Directory "/opt/lampp/phpMyAdmin"> AllowOverride AuthConfig Require all granted - Does XAMPP-VM support Apple M1 (arm64) CPUs?
-
No. The components within the VM do not presently support Apple M1 (arm64) CPUs. The VM may only be used on Apple computers with intel (x64) CPUs.
This is the situation as of September 2022. We hope that the VM components will support Apple M1 CPUs in the future, so that XAMPP VMs will be usable on those Apple computers as well.
- Where are the XAMPP-VM virtual machine files and logs?
-
The XAMPP-VM virtual machine files and logs are stored within your home directory on the OS X host, in the ~/.bitnami/stackman/machines/xampp/vm and ~/.bitnami/stackman/machines/xampp/log directories respectively.
- Where are the main XAMPP configuration files?
-
The main XAMPP configuration files are located as follows:
- Apache configuration file: /opt/lampp/etc/httpd.conf, /opt/lampp/etc/extra/httpd-xampp.conf
- PHP configuration file: /opt/lampp/etc/php.ini
- MySQL configuration file: /opt/lampp/etc/my.cnf
- ProFTPD configuration file: /opt/lampp/etc/proftpd.conf
- How do I send email with XAMPP?
-
To send email with XAMPP, use the PEAR Mail and Net_SMTP packages, which allow you to send email using an external SMTP account (such as a Gmail account). Follow these steps:
- Install the Mail and Net_SMTP PEAR modules:
pear install Net_SMTP MailNote that if these packages are already installed in your system you see the messages below when executing that command:Ignoring installed package pear/Net_SMTP Ignoring installed package pear/Mail Nothing to install -
Create the following example script in your "htdocs" directory to send an email:
          <?php
          require_once "Mail.php";

          $from = "your-gmail-username@gmail.com";
          $to = 'recipients@example.com';

          $host = "ssl://smtp.gmail.com";
          $port = "465";
          $username = 'your-gmail-username@gmail.com';
          $password = 'your-gmail-password';

          $subject = "test";
          $body = "test";

          $headers = array ('From' => $from, 'To' => $to,'Subject' => $subject);
          $smtp = Mail::factory('smtp',
             array ('host' => $host,
               'port' => $port,
               'auth' => true,
               'username' => $username,
               'password' => $password));

          $mail = $smtp->send($to, $headers, $body);

          if (PEAR::isError($mail)) {
            echo($mail->getMessage());
          } else {
            echo("Message successfully sent!\n");
          }
          ?>
Remember to replace the dummy values shown with your actual Gmail address and account password. If you don't plan to use Gmail's SMTP server, replace the SMTP host details with appropriate values for your organization or ISP's SMTP server.
- Execute the script by browsing to it using your Web browser. You should see a notification that the message was successfully sent, and the message should be delivered to the recipient email address.
- Install the Mail and Net_SMTP PEAR modules:
- How do I backup/restore my XAMPP-VM system?
-
WARNING: The backup and restore functionality is still under development and may not work correctly.
You can create the backup as follows:
- Launch the stack manager by double-clicking the XAMPP icon in the mounted disk image.
- Ensure that all services are running in the "Services" tab of the stack manager (or start them as needed).
- Open a new terminal from the "General" tab of the stack manager and run the following command in it:
or/opt/lampp/lampp backup
Where "secret" is your MySQL root password. This command will create the following output:/opt/lampp/lampp backup secret
The file /Applications/XAMPP/xamppfiles/backup/xampp-backup-22-01-14.sh (in the example above) contains your backup data. Move or copy this file to a safe place.Backing up databases... Backing up configuration, log and htdocs files... Calculating checksums... Building final backup file... Backup finished. Take care of /Applications/XAMPP/xamppfiles/backup/xampp-backup-22-01-14.sh - Mount the /opt/lampp directory from the "Volumes" tab of the stack manager and click the "Explore" button to open the file manager.
- Move the backup file to a safe place on the host system.
To restore the backup on a new system, you need the same version of XAMPP-VM as on your original/source system. Follow these steps to restore the backup:
- Launch the stack manager by double-clicking the XAMPP icon in the mounted disk image.
- Ensure that all services are running in the "Services" tab of the stack manager (or start them as needed).
- Mount the /opt/lampp directory from the "Volumes" tab of the stack manager and click the "Explore" button to open the file manager.
- Copy the backup file from the host system to the mounted directory.
- Open a new terminal from the "General" tab of the stack manager, change to the directory containing the backup file and run the following command (change the file name in the command to reflect the actual backup file name):
You should see something like this:./xampp-backup-22-01-14.shChecking integrity of files... Restoring configuration, log and htdocs files... Checking versions... Installed: XAMPP 1.4.2 Backup from: XAMPP 1.4.2 Restoring MySQL databases... Restoring MySQL user databases... Backup complete. Have fun! You may need to restart XAMPP to complete the restore
- How do I increase the size of the XAMPP-VM disk?
-
IMPORTANT: Ensure that you have booted the XAMPP-VM virtual machine at least once before following the steps below. Resizing the disk without a first boot may cause the virtual machine to fail afterwards.
To increase the size of the XAMPP-VM disk, follow these steps:
- Shut down XAMPP-VM and make a complete backup of the disk, so that you can easily recover in case of errors.
- Install QEMU on the OS X host:
brew update brew install qemu - Check the disk for errors:
qemu-img check ~/.bitnami/stackman/machines/xampp/vm/machine.qcow2 - If any errors were found, repair them before attempting to resize the disk:
qemu-img check -r all ~/.bitnami/stackman/machines/xampp/vm/machine.qcow2 - Resize the disk. Here's an example of making it 10GB larger:
qemu-img resize ~/.bitnami/stackman/machines/xampp/vm/machine.qcow2 +10G - Start XAMPP-VM.
- Once XAMPP-VM has started, click the "Open Terminal" button in the XAMPP control panel. From within the terminal, increase the size of the primary partition and update the filesystem iwith the fdisk and resize2fs commands. Refer to the output below for an example displaying the necessary commands and expected results:
root@debian:~# df -h . Filesystem Size Used Avail Use% Mounted on /dev/vda1 15G 1.4G 13G 10% / root@debian:~# sudo fdisk /dev/vda Welcome to fdisk (util-linux 2.25.2). Changes will remain in memory only, until you decide to write them. Be careful before using the write command. Command (m for help): p Disk /dev/vda: 24.9 GiB, 26737418240 bytes, 52221520 sectors Units: sectors of 1 * 512 = 512 bytes Sector size (logical/physical): 512 bytes / 512 bytes I/O size (minimum/optimal): 512 bytes / 512 bytes Disklabel type: dos Disk identifier: 0x00000000 Device Boot Start End Sectors Size Id Type /dev/vda1 * 2048 31248383 31246336 14.9G 83 Linux Command (m for help): d Selected partition 1 Partition 1 has been deleted. Command (m for help): p Disk /dev/vda: 24.9 GiB, 26737418240 bytes, 52221520 sectors Units: sectors of 1 * 512 = 512 bytes Sector size (logical/physical): 512 bytes / 512 bytes I/O size (minimum/optimal): 512 bytes / 512 bytes Disklabel type: dos Disk identifier: 0x00000000 Command (m for help): n Partition type p primary (0 primary, 0 extended, 4 free) e extended (container for logical partitions) Select (default p): p Partition number (1-4, default 1): 1 First sector (2048-52221519, default 2048): Last sector, +sectors or +size{K,M,G,T,P} (2048-52221519, default 52221519): Created a new partition 1 of type 'Linux' and of size 24.9 GiB. Command (m for help): p Disk /dev/vda: 24.9 GiB, 26737418240 bytes, 52221520 sectors Units: sectors of 1 * 512 = 512 bytes Sector size (logical/physical): 512 bytes / 512 bytes I/O size (minimum/optimal): 512 bytes / 512 bytes Disklabel type: dos Disk identifier: 0x00000000 Device Boot Start End Sectors Size Id Type /dev/vda1 2048 52221519 52219472 24.9G 83 Linux Command (m for help): w The partition table has been altered. Calling ioctl() to re-read partition table. Re-reading the partition table failed.: Device or resource busy The kernel still uses the old table. The new table will be used at the next reboot or after you run partprobe(8) or kpartx(8). root@debian:~# partx -u /dev/vda1 root@debian:~# sudo resize2fs /dev/vda1 resize2fs 1.42.12 (29-Aug-2014) Filesystem at /dev/vda1 is mounted on /; on-line resizing required old_desc_blocks = 1, new_desc_blocks = 2 The filesystem on /dev/vda1 is now 6527434 (4k) blocks long. root@debian:~# df -h . Filesystem Size Used Avail Use% Mounted on /dev/vda1 25G 1.4G 22G 6% / - Restart XAMPP-VM. You should now be able to use the larger disk.
- How do I change the XAMPP-VM required memory?
-
WARNING: Install JQ on your Mac before running the commands suggested on this section.
brew update
        brew install jq
To check the required memory of your VM, open a terminal and run the command below. Replace the APP_NAME placeholder with the correct directory name:
$ cat ~/.bitnami/stackman/machines/APP_NAME/metadata.json | jq '.requiredMemory'To change the VM required memory, follow these steps:
- Launch the stack manager by double-clicking the XAMPP icon in the mounted disk image.
- Click the "Stop" button in the "General" tab of the stack manager. Once the status icon turns red, close the stack manager window.
- Open a terminal and change the "requiredMemory" running the command below. Replace the MEMORY placeholder with the value you want to set.
$ cat ~/.bitnami/stackman/machines/APP_NAME/metadata.json | jq '.requiredMemory = MEMORY' | tee ~/.bitnami/stackman/machines/APP_NAME/metadata.json - Launch the stack manager by double-clicking the XAMPP icon in the mounted disk image.
- Click the "Start" button in the "General" tab of the stack manager. Wait for the status icon to turn green.
- Once XAMPP-VM has started, click the "Open Terminal" button in the XAMPP control panel. From within the terminal, verify the allocated memory running the command below:
$ free -h
- How do I upgrade XAMPP-VM?
-
If you download a new version of XAMPP-VM and try to run it, you may see a warning message about overwriting data. This warning appears when you already have a previous version of XAMPP-VM deployed on your OS X system. It ensures that you do not accidentally overwrite your existing XAMPP-VM data.
To upgrade XAMPP-VM in this scenario, follow these steps:
- Back up all the data that you need from the existing XAMPP-VM deployment, including all files, databases, custom plugins, media and other assets.
- Remove or rename the previous XAMPP-VM image files by deleting the ~/.bitnami/stackman/machines/xampp directory.
- Deploy the new version of XAMPP-VM.
- Restore all the data backed up from the previous version, by copying it to the correct place in the new version.
- How do I uninstall XAMPP-VM?
-
To uninstall XAMPP-VM, follow these steps:
- Delete the XAMPP-VM icon from the Applications folder.
- Remove all XAMPP-VM data by deleting the ~/.bitnami folder within your home directory on the OS X host.